That perfect spot for a new lamp or wall-mounted TV rarely has an outlet nearby. While extension cords are a temporary fix, a permanent solution often involves running electrical wire through walls to create a new power source. This project can seem intimidating, and for good reason—it requires precision and a solid understanding of how your home’s electrical system works. Before you cut into your drywall, it’s critical to have a clear plan. This guide breaks down the entire process into manageable steps, focusing on the safety precautions and techniques professionals use to get the job done right, ensuring your new wiring is both functional and secure for years to come.
Key Takeaways
- Safety and Strategy First: Always begin by turning off the power at the breaker and verifying with a voltage tester. Before you cut, use a stud finder to map a clear path for the wire, planning around studs, pipes, and other hidden obstacles to prevent costly damage.
- Drill Smart and Protect Your Work: To prevent future damage from nails or screws, drill holes in the exact center of studs. Once the wire is run, install metal strike plates over these spots to shield the wire, ensuring a safe installation that lasts for years.
- Follow the Rules and Know Your Limits: Using the correct wire gauge for your circuit’s amperage is a non-negotiable safety rule to prevent fire hazards. If your project involves the main electrical panel, requires a permit, or feels too complex, calling a professional is the smartest choice.
Gather Your Tools and Materials
Before you cut into any walls, having the right tools on hand will make the job smoother, safer, and more professional. A well-prepared workspace is the first step to a successful project. Think of it like cooking—you wouldn’t start making a new recipe without getting your ingredients out first. Taking a few minutes to gather everything you need will save you from making multiple trips to the hardware store and help you stay focused on the task.
Essential Hand Tools
For most basic wire-running projects, you’ll need a core set of hand tools. Start with a stud finder to map out what’s behind your drywall—this is key to avoiding surprises. You’ll also need a drywall saw for making clean openings and a drill with a flexible shaft and a 1-inch spade or auger bit to get through studs. To actually pull the wire, electrician’s fish tape is your best friend. It’s a long, flat, and flexible metal wire that helps you guide the electrical cable through the wall cavity. Finally, have a good cable ripper and wire strippers ready for when you need to connect everything.
Specialized Wire-Running Equipment
If your wire route is long or has a few tricky corners, some specialized equipment can be a lifesaver. Glow rods are flexible, screw-together sticks that, as the name suggests, glow in the dark, making them much easier to spot inside a dark wall. They’re perfect for reaching across wide wall cavities. Another great tool is a flex bit, which is a long, flexible drill bit with a small hole at the tip. You can drill through multiple studs in a row, then attach your wire to the end and pull it right back through the hole you just made, which saves a ton of time and effort.
Wire Types and Electrical Materials
Choosing the correct wire is critical for safety and function. For most indoor residential projects, you’ll use non-metallic (NM) cable, often called Romex. It’s designed for use in dry, protected areas like inside your walls. You also need to match the wire gauge to the circuit’s amperage. As a general rule, 14-gauge wire is used for 15-amp circuits (think standard lighting and outlets), while thicker 12-gauge wire is required for 20-amp circuits, which are common in kitchens and bathrooms. Using the wrong wire can create a serious fire hazard, so it’s a step you can’t afford to get wrong. If you’re unsure, our team can always help with residential electric projects.
Safety Equipment and Protective Gear
Safety should always be your top priority. First, make sure you have the right protective gear, including safety glasses and insulated gloves. When running the wire itself, you can’t just leave it loose in the wall. Electrical codes require you to protect the cable. This often means running it through conduit, especially in areas where it could be damaged. At a minimum, you should use plastic grommets where the wire passes through metal studs to prevent the sharp edges from cutting into the wire’s insulation over time. These small protective measures are essential for preventing short circuits and ensuring a safe installation.
Prioritize Safety: Key Electrical Precautions
Before you drill a single hole or touch a single wire, let’s talk about the most important part of this project: safety. Electrical work isn’t the place to cut corners. These precautions are simple, but they are absolutely essential to protect you, your family, and your home from serious harm. Taking a few extra minutes to follow these steps will ensure your project goes smoothly and safely from start to finish.
Turn Off Power at the Circuit Breaker
This is your first and most critical step. Before you do anything else, you must turn off the power to the circuit you’ll be working on at the main breaker box. Find your electrical panel and flip the correct breaker to the “OFF” position. If your breakers aren’t clearly labeled, you might need to do a little detective work by turning them off one by one and testing outlets or lights in the area. Once you’ve found the right one, place a piece of tape over it with a note so no one accidentally flips it back on while you’re working. If you’re ever unsure about your panel, it’s always best to call for professional electrician repairs.
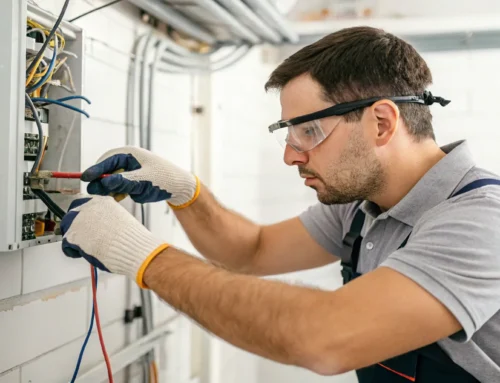
Use Proper Protective Equipment
Safety gear is non-negotiable. Always wear safety glasses to protect your eyes from debris and insulated gloves to provide an extra layer of protection. But it’s not just about protecting yourself—you also need to protect the wiring and your home. When running wires through walls, you must use a cable or conduit to shield the electrical conductors from damage. This prevents the wire’s insulation from being punctured by a stray nail or screw down the road, which could create a serious fire hazard. Using the right protective materials ensures your wiring is secure, supported, and safe for the long term.
Check Local Building Codes and Permits
Electrical work is regulated for a reason—to keep everyone safe. Before you start, you need to check your local building codes and find out if your project requires a permit. As experts often note, these rules can be very different depending on where you live in Chester, Montgomery, Bucks, or Delaware County. These codes dictate everything from the type of wire you can use to how it must be secured. Skipping this step can lead to failed inspections, fines, or an unsafe installation that could put your home at risk. A professional will handle all the permits and ensure your project is fully compliant with all local regulations.
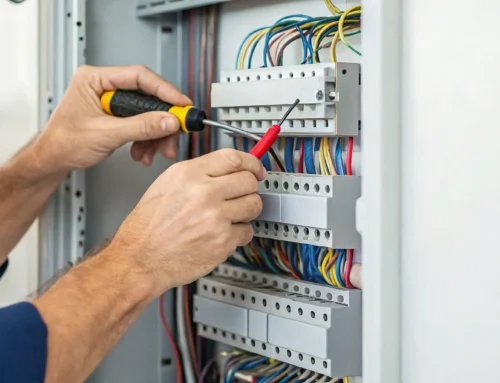
Test Wires with a Voltage Tester
Even after you’ve shut off the breaker, you need to confirm the power is truly off. This is where a voltage tester comes in. It’s an inexpensive and easy-to-use tool that can save you from a dangerous electrical shock. Before touching any wires, simply hold the tip of a non-contact voltage tester near them. The tester will light up or beep if it detects a current. Always use your voltage tester to ensure the wires are not live before you start working. This simple “trust but verify” step is a crucial final check that guarantees your work area is safe and ready.
Plan Your Wire Route
Before you cut a single hole in your drywall, the most important part of the job has already begun: planning. Think of it as creating a detailed roadmap for your new electrical wire. Taking the time to map out a clear and unobstructed path is the single best thing you can do to ensure your project goes smoothly. It’s the difference between a quick, successful installation and a frustrating afternoon spent patching unexpected holes or, even worse, repairing a punctured pipe. A good plan helps you anticipate challenges, gather the correct tools and materials from the start, and avoid the common pitfalls that can turn a simple wiring job into a major headache.
The goal is to find the path of least resistance from the power source to your new outlet, switch, or fixture. This means identifying where studs, fire blocks, plumbing, and ductwork are hiding inside your walls. By knowing what’s in your way, you can work around it efficiently. This foresight not only saves you time and materials but also protects your home from unnecessary damage. A well-planned route results in a cleaner, safer, and more professional-looking finish. If you’re tackling a larger project and want a comprehensive plan from the start, our team is always here to help with your residential electric needs, making sure everything is designed safely and up to code.
Locate Studs and Obstacles with a Stud Finder
Your walls are not empty voids; they have a hidden skeleton of studs and cross-braces that provide structural support. “Always plan your route before you start cutting holes to avoid hitting hidden blocks inside the walls.” A quality stud finder is an indispensable tool for this step. Slowly slide it across the wall along your proposed path and use a pencil to lightly mark the edges of each stud it detects. This gives you a clear visual map of the framework you need to navigate. Knowing where the studs are allows you to plan your holes precisely, either drilling through the center of them or avoiding them altogether, which is often the easier option.
Map Your Path Around Plumbing and HVAC
Beyond the wooden frame, your walls can also conceal plumbing pipes and HVAC ducts. Hitting one of these is a costly and messy mistake you want to avoid at all costs. Before you plan your route, take note of where your bathrooms, kitchen, laundry room, and vents are located, as pipes and ductwork will be concentrated in these areas. If your path must cross a space used for air return, you have to use a special “plenum-rated” cable, which is designed with a low-smoke, low-flame coating to be safer in a fire. It’s always better to choose a slightly longer, clearer path than to risk damaging your home’s critical systems.
Choose Optimal Access Points to Minimize Damage
To run the wire, you’ll need to make openings in the wall, but you can keep the cutting to a minimum with a little strategy. Look for opportunities to “use existing holes from removed light fixtures, switches, or outlets to serve as your access points for fishing wire.” By temporarily removing a fixture, you can use its electrical box as a starting or ending point for your wire run. This smart approach means you’ll have fewer holes to patch and paint later, saving you significant time and effort during the finishing stage of your project. It’s a simple trick that makes the whole process much cleaner.
Plan for the Correct Wire Gauge and Circuit Capacity
Using the right type of wire is non-negotiable for a safe electrical system. The wire’s gauge, or thickness, must be properly matched to the circuit’s amperage rating to prevent overheating. For example, “14-gauge wire is typically good for 15-amp circuits (like lighting). 12-gauge wire handles 20 amps, common for outlets and kitchens.” Using a wire that’s too thin for the electrical load is a serious fire hazard. If you’re not completely certain which wire gauge or circuit type your project requires, it’s best to pause and consult a professional. Our experts can handle all types of electrician repairs and ensure your wiring is safe and up to code.
Run Electrical Wire Through Walls: A Step-by-Step Guide
With your tools gathered and your safety checks complete, you’re ready for the main event. Running wire through a wall can feel like a bit of a magic trick, but it’s really just a matter of patience and following a clear process. This guide breaks it down into manageable steps, from making the first cut to pulling the wire through to its new home. Remember to work carefully and deliberately. A clean, professional-looking result starts with getting these fundamental steps right. If at any point you feel unsure, don’t hesitate to pause and reassess.
Cut Precise Access Holes
First things first, you need a way into the wall. Using your stud finder, confirm where the wall studs are so you can plan your cuts in the open space between them. With a pencil, mark the location for your new electrical box. Use a drywall saw to carefully cut a clean, rectangular opening just large enough for the box to fit snugly. If you need to run the wire horizontally across several studs, you’ll have to cut additional access holes over each stud you need to drill through. Taking your time here makes patching the drywall much easier later on.
Drill Through Studs Safely
When your wire’s path crosses a wall stud, you’ll need to drill a hole through it. The key here is to drill in the absolute center of the stud. This isn’t just for stability; building codes require it for safety. Your hole must be at least 1 1/4 inches away from the edge of the stud on either side. This crucial setback prevents anyone from accidentally puncturing the wire with a nail or screw later. Use a sharp spade or auger bit to create a clean, straight hole that’s just large enough for the wire to pass through without being pinched or damaged.
Attach Wire to Fish Tape
Fish tape is your best friend for this job. This flexible steel or fiberglass tape is designed to snake through wall cavities with ease. To use it, pull out the end of the tape and securely attach your electrical wire to its hook or loop. Don’t just hook it on and hope for the best. Wrap the connection point smoothly with electrical tape, creating a tapered end that won’t snag on insulation or other obstructions inside the wall. A secure attachment ensures you won’t lose the wire halfway through the pull, forcing you to start all over again.
Feed the Fish Tape Through Wall Cavities
Now it’s time to go fishing. Start at one access hole and gently feed the fish tape through the wall cavity toward your destination. You might hit insulation or a fire block, so you’ll need to use a bit of finesse, pushing and pulling gently to find a clear path. This is often easier with a partner—one person can feed the tape while the other listens and looks for it at the other end. If you’re struggling, a set of flexible glow rods can also be a huge help, especially for insulated walls or longer distances.
Pull the Wire to Its Destination
Once the tip of your fish tape appears at the exit hole, you’re in the home stretch. Grab the end of the tape and begin pulling it—and the attached wire—through the wall. Use smooth, steady pressure to guide the wire. Avoid yanking it, as that can damage the wire’s sheathing or cause it to snag. Once the wire is through, make sure you leave at least eight inches of extra wire hanging out of each opening. This extra length, or “service loop,” is essential for making safe connections inside the electrical box and allows for future electrician repairs if needed.
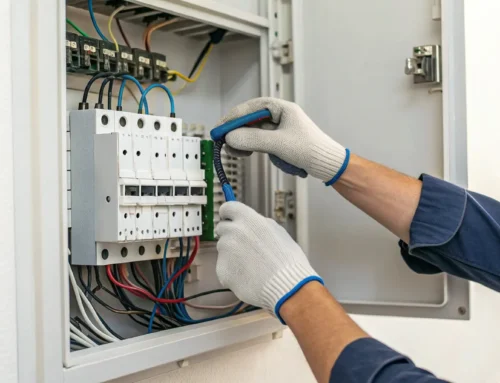
Secure and Connect the Wire
With the wire successfully run, the final step is to secure it properly. Guide the end of the wire into your new electrical box through one of the built-in clamps. Tighten the clamp just enough to hold the wire firmly without crushing it. This prevents the wire from being pulled out of the box and protects the connections inside. At this stage, you’re ready to strip the wire ends and connect them to the new outlet or switch. If you have any doubts about making these final connections, this is the perfect time to contact our team of professionals to finish the job safely.
How to Run Wire Without Damaging Your Home
Running a new wire is only half the battle; doing it without leaving a trail of destruction is the real art. The last thing you want is to turn a simple wiring project into a major home repair job. A thoughtful approach can save you from patching drywall, fixing pipes, or worse, creating a serious safety issue. Taking a few extra minutes to plan your route and protect your work will ensure your project looks clean and professional, keeping your walls and existing systems intact. These strategies are what separate a weekend DIY project from a call for costly repairs.
Work Around Hidden Plumbing and Wires
Before you cut a single hole, it’s crucial to map out your wire’s entire journey. Walls are full of surprises, from plumbing pipes and HVAC ducts to existing electrical lines. Always plan your route before you start cutting to avoid hitting hidden blocks inside the walls. Use a high-quality stud finder that can also detect metal and live AC wiring. By taking a few moments to trace the path and mark stud locations, you can create a clear channel from point A to point B. This simple step helps you prevent a costly plumbing leak or a dangerous electrical short, saving you from needing complex electrician repairs down the road.
Drill Holes in the Center of Studs
When your path requires you to go through studs, placement is everything. When you drill holes through wooden studs for electrical wires, your hole should not be closer than 1 1/4 inches from the outside edge of the stud. Why is this so specific? This distance creates a safe buffer zone, protecting the wire from common drywall screws or nails that might be used later on. Drilling in the center of the stud keeps the wire tucked safely away from any future wall hangings or renovations. This maintains the integrity of both your new wire and your wall structure for years to come, preventing accidental damage.
Use Unfinished Spaces When Possible
Sometimes the most direct route isn’t the best one. The easiest path for wires might be through basements or attics, even if it means using a bit more wire. This can save you a lot of time and effort compared to going directly through finished walls. Running wires along joists in an unfinished basement or attic is far simpler than patching and repainting drywall in your living room. This approach minimizes disruption to your living space and reduces the risk of unforeseen complications. It’s a common technique used in professional residential electrical projects to get the job done efficiently and cleanly.
Install Strike Plates to Protect Wires
For an added layer of long-term safety, don’t skip the strike plates. Nail plates are thin metal plates that you hammer onto the outside surface of the stud where you’ve drilled a hole and run a wire. They act as a shield. If someone later tries to drill or nail into that spot to hang a picture or install a shelf, they will hit the metal plate instead of the electrical wire. This small, inexpensive piece of hardware is a critical safeguard that protects your wiring from accidental punctures during any future work. It’s a simple step that ensures your home and your family stay safe from electrical hazards.
Avoid These Common DIY Wiring Mistakes
Even with the best intentions, a simple DIY wiring project can go wrong if you’re not aware of the common pitfalls. These mistakes aren’t just frustrating—they can create serious safety risks for your home and family. Taking the time to understand what to avoid is just as important as learning the right steps. Let’s walk through some of the most frequent errors so you can steer clear of them and ensure your project is a success. When you know what to look out for, you can work more confidently and keep your home safe.
Incorrect Hole Placement and Poorly Secured Wires
When you’re drilling through studs, precision is key. Drilling a hole too close to the edge of a stud can expose the wire to future damage from drywall screws or nails. The goal is to keep the wire protected deep within the wall cavity. Just as important is securing the wire correctly. Wires left loose inside a wall can sag, stretch, or get pinched over time, leading to damaged insulation and a potential fire hazard. Ensuring wires are properly fastened and run through the center of studs is a critical step that professionals never skip. If you discover loose or poorly placed wiring from a past project, it’s best to call for electrician repairs to get it fixed safely.
Code Violations That Create Safety Hazards
Electrical codes can seem complicated, but they exist for one primary reason: to keep you safe. Many DIY projects accidentally violate local or national electrical codes, creating hidden dangers. A common mistake is using a wire gauge that’s too small for the circuit’s amperage, which can cause the wire to overheat. Another is failing to use protective plates over holes in studs where wires pass through, leaving them vulnerable. Professional electricians are trained on the latest National Electrical Code (NEC) standards and local requirements, ensuring every installation is done by the book. This isn’t just about passing an inspection; it’s about long-term peace of mind.
Overloaded Circuits and Improper Connections
One of the most dangerous DIY mistakes is creating an overloaded circuit. This happens when you try to draw more power than the circuit is designed to handle, which can lead to overheating and electrical fires. It often results from adding a new outlet or fixture to an existing circuit without knowing its total load. Equally hazardous are improper connections. A wire nut that isn’t twisted on tightly or a loose connection at an outlet can create arcing—an electrical spark that can ignite surrounding materials like wood and insulation. These seemingly small details are where professional expertise in residential electrical work makes all the difference.
Skipping Proper Labeling
In the rush to finish a project and turn the power back on, it’s easy to forget one final, crucial step: labeling your work. Failing to label the new circuit in your electrical panel can create a major headache and a safety risk down the road. Imagine trying to troubleshoot an issue or needing to shut off power to that specific area in an emergency and having to guess which breaker it is. A clearly labeled panel helps you, a future homeowner, or an electrician quickly identify each circuit. It’s a simple habit that signals a job was done thoughtfully and professionally, making any future electrical work much safer and more efficient.
Know When to Call a Professional Electrician
While tackling a DIY project can be incredibly rewarding, electrical work isn’t the place to test your limits. The risks of fire and electric shock are serious, and some jobs are simply best left to those with years of training and experience. Knowing when to put down the tools and pick up the phone is a sign of a smart homeowner, not a failed DIYer. It’s about recognizing that safety and long-term reliability are more important than saving a few dollars in the short term. Mistakes in electrical wiring aren’t always obvious. A faulty connection might work for a while before it overheats and creates a fire hazard inside your walls.
That’s why certain projects have clear boundaries that separate a manageable DIY task from a job that requires a professional. Think of it this way: changing a lightbulb is simple, but installing the entire fixture and its new wiring is a different story. We’ll cover three key situations where calling an expert is non-negotiable. If your project involves complex wiring, requires official permits and inspections, or means you have to open up your main electrical panel, it’s time to call in a licensed professional. This ensures the job is done safely, correctly, and in compliance with all local codes, protecting your home and your family.
For Complex Electrical Projects
If your project goes beyond swapping out a light fixture or replacing an outlet, it’s wise to consult an expert. Rewiring a room, adding a new circuit for a major appliance, or installing specialty lighting systems are all examples of complex residential electric projects that require a deep understanding of electrical theory and local building codes. These codes can vary significantly between townships and counties, dictating everything from the type of wire you can use to where outlets must be placed. A professional electrician has the knowledge to complete the work correctly and the experience to troubleshoot the unexpected issues that often pop up in older homes or with intricate wiring plans.
When Permits and Inspections Are Required
Many electrical projects require a permit from your local municipality before work can even begin. This isn’t just bureaucratic red tape; it’s a crucial safety measure. Permits trigger inspections, where a certified inspector verifies that the work meets the standards of the National Electrical Code (NEC) and any local amendments. This process ensures that your wiring is safe and won’t pose a hazard to your family or your home. A licensed electrician is familiar with the local requirements and will manage the entire permitting and inspection process for you, saving you time and giving you peace of mind that your project is officially up to code.
If You Need to Work in Your Main Electrical Panel
Your home’s main electrical panel is the heart of your electrical system, and working inside it is extremely dangerous for anyone who isn’t a trained professional. Even if you shut off the main breaker, the service lugs where power enters the panel from the utility line remain live and carry a lethal voltage. Any project that involves adding a new circuit breaker, upgrading your panel, or installing a generator transfer switch requires professional expertise. For any electrician repairs or upgrades involving your panel, always call a licensed electrician. They have the proper safety equipment and knowledge to work safely and ensure your entire system functions correctly.
Finish Your Project with Confidence
Getting the wire from point A to point B is a huge accomplishment, but the job isn’t quite done. Taking a few final steps ensures your work is safe, secure, and built to last. Before you patch up any drywall, run through this final checklist to make sure you’ve covered all your bases.
First, focus on protecting your new wiring. Once the wire is in place, make sure it’s properly secured and that all connections are made safely to prevent future electrical hazards. If you drilled through wooden studs, it’s a smart move to cover the holes with metal “strike plates.” This simple step is crucial because it protects the wire from being accidentally punctured by nails or screws down the road. It’s a small detail that makes a big difference in the safety and longevity of your project.
Next, take a moment to review your work with a critical eye. The best way to avoid problems is by carefully planning your route before you even start cutting, which helps you miss hidden blocks or pipes. Always be cautious when cutting or drilling to avoid hitting existing electrical wires, water pipes, or gas lines. A quick double-check can save you from a much bigger headache later on.
Finally, make sure your project is up to code. It’s essential to check your local building codes, as the rules can be different depending on where you live. What’s standard in one township might not be in another. Taking the time to understand and follow these regulations ensures your work is not only safe but also compliant, giving you true peace of mind.
Related Articles
- How Much to Replace an Electrical Panel in 2025?
- Hiring an Electrical Repair Service? Read This First
- Price for Electrical Panel Upgrade: A 2025 Cost Guide
Frequently Asked Questions
What’s the single most important safety step I should take before starting? Without a doubt, your first and most critical action is to turn off the power at the circuit breaker. After you flip the breaker, you must confirm the power is truly off by using a voltage tester on the wires you plan to touch. This two-step process of shutting off the power and then verifying it’s off is non-negotiable and protects you from a serious electrical shock.
Why is it so important to plan the wire’s path before I start cutting holes? Taking the time to map out your wire’s route is the difference between a smooth project and a frustrating one. Your walls contain studs, plumbing, and ductwork you can’t see. A good plan, made with the help of a stud finder, helps you find the clearest and safest path, preventing you from accidentally drilling into a pipe or having to patch multiple unnecessary holes in your drywall.
What should I do if my fish tape gets stuck on something inside the wall? The first rule is don’t force it. Yanking on the wire or fish tape can damage the wire’s protective sheathing or get it even more tangled. Instead, gently pull it back a few feet and try feeding it forward again, wiggling it to find a different path. You may have hit a fire block or insulation. If it remains stuck, you might need to cut a small access hole midway to see what the obstruction is and guide the wire past it.
Do I really need to use those metal strike plates over the holes in the studs? Yes, absolutely. Those small metal plates are a crucial safety feature. They act as a shield, preventing anyone from accidentally driving a nail or screw into your new wire when they hang a picture or install shelving in the future. It’s an inexpensive and easy step that protects your wiring and your home from a potential fire hazard for years to come.
My project seems simple, but what’s a clear sign I should stop and call a professional? You should stop immediately and call a professional if your project requires you to work inside your main electrical panel. Even with the main breaker off, parts of the panel remain live with dangerous voltage. Other clear signs are projects that involve adding a brand new circuit to the panel or any work that requires a permit and inspection from your local municipality.