It’s a familiar frustration: a frayed cord on your favorite lamp or a cracked plug on a power tool. Your first thought might be to toss it, but the fix is surprisingly simple. You can bring your device back to life in just a few minutes by replacing the plug. This guide shows you exactly how. We’ll walk you through the straightforward process of proper 110 plug wiring, from identifying the different wires to making secure connections. Instead of buying a replacement, you can learn the valuable skill of wiring a 110 plug and save a perfectly good appliance.
Key Takeaways
- Your first step is always safety: Before touching any wires, shut off the corresponding circuit breaker. Then, use a voltage tester on the outlet to be absolutely sure the power is off.
- Match the colors for a correct connection: Wiring is simple when you follow the code: the black (hot) wire connects to the gold screw, the white (neutral) wire to the silver screw, and the green or bare copper (ground) wire to the green screw.
- A secure connection and a final test are essential: Wrap wires clockwise around the terminal screws for a tight, secure fit. Once you’re done, test the outlet with a voltage meter to confirm it’s working correctly before you use it.
What Exactly Is a 110-Volt Plug?
You plug things in every day, but have you ever stopped to think about what’s happening behind the wall? Understanding the basics of a 110-volt plug—the standard outlet you use for your lamps, phone charger, and TV—is the first step toward tackling any home electrical project safely. It’s the workhorse of your home’s electrical system, delivering power exactly where you need it.
While it might seem technical, the concept is pretty straightforward. A 110-volt plug is designed to create a safe, controlled path for electricity to travel from your home’s wiring to your devices. Let’s break down how this common but crucial component works.
How a 110-Volt System Works
First things first, you might hear these outlets called 110-volt, 115-volt, or 120-volt. These terms are often used interchangeably, but they all refer to the same standard system in North America. This system relies on three wires to function safely. You have a “hot” wire (usually black) that carries the electrical current, a “neutral” wire (white) that completes the circuit, and a “ground” wire (green or bare copper) that acts as a safety net. The ground wire provides a path for electricity to escape safely in case of a short circuit, which helps prevent shocks. This three-wire setup is fundamental to modern residential electric systems.
What Are the Parts of a Standard 110 Plug?
If you look closely at a 110-volt outlet, you’ll notice the screws on the sides where the wires connect are color-coded for a reason. This is a universal system designed to make sure wires go to the right place. The gold screws are for the hot wire, which carries the voltage. The silver screws are for the white neutral wire, which completes the electrical circuit. Finally, the green screw is reserved for the ground wire. Following this color code is non-negotiable for a safe installation. It ensures electricity flows correctly and that the outlet’s safety features can do their job when needed.
110-Volt vs. 220-Volt: What’s the Difference?
The main difference between 110-volt and 220-volt plugs comes down to power. A 110-volt outlet is perfect for most of your everyday electronics and small appliances. A 220-volt outlet, on the other hand, is built to handle heavy-duty appliances that need more power, like electric dryers, ovens, and some air conditioning units. You can spot the difference just by looking at them. A 220-volt plug is larger and has a different prong shape to prevent you from accidentally plugging a standard appliance into a high-power source. If you’re having issues with either type of outlet, it’s always a good idea to call for a professional electrician repair to diagnose the problem safely.
What Tools and Materials Do You Need?
Before you touch a single wire, let’s talk about preparation. Getting all your tools and materials in one place before you start makes the job go smoother and, more importantly, safer. Think of it like gathering your ingredients before you start cooking—it prevents that mid-project scramble. Having the right gear on hand is the first step to a successful wiring project. If you find yourself missing more than a few of these essential items, it might be a good time to consider calling in a professional for your electrician repairs.
Your Essential Wiring Toolkit
You don’t need a professional-grade workshop, but a few key tools are non-negotiable for this task. At a minimum, you will need a good pair of wire strippers/crimpers and a screwdriver (both a flathead and a Phillips head will come in handy). Wire strippers are essential for removing the plastic sheathing from the wires without damaging the copper underneath. I also recommend having a pair of needle-nose pliers for bending wires into hooks and a utility knife for cutting the outer cable jacket. Finally, the most important tool in your kit is a voltage tester. This simple device confirms whether the power is truly off before you begin work.
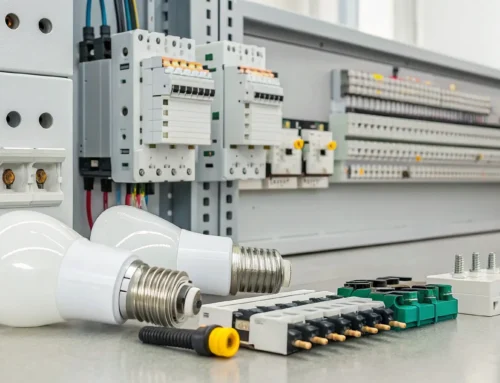
Picking the Right Wires and Replacement Parts
Next, let’s look at the materials. For a standard 110-volt plug, you’ll be working with a cable containing three wires. It’s crucial to know what each color means: the ground wire is green or bare copper, the neutral wire is white, and the hot (or live) wire is usually black or red. For most residential electric projects, you’ll use a non-metallic sheathed cable, often called “Romex,” which contains solid copper wires. You’ll also need the new plug itself. Make sure it’s rated for the amperage of your circuit—most standard home outlets are 15-amp. Using the correct wire and plug ensures your connection is safe and up to code.
Choosing the Correct Wire Gauge
Not all wires are created equal, and using the right size is critical for safety. The thickness of a wire is measured by its gauge, specifically the American Wire Gauge (AWG). It’s a bit counterintuitive, but the lower the AWG number, the thicker the wire. A thicker wire can handle more electrical current without overheating. For example, for circuits that carry 30 amps, like those used for RVs or some portable generators, you should use wires that are at least 10 AWG thick. This thickness is essential to prevent the wires from getting too hot, which can melt the insulation and create a serious fire hazard. For standard 15-amp household circuits, you’ll typically see 14-gauge wire, while 20-amp circuits use a thicker 12-gauge wire.
Selecting Quality, NEMA-Compliant Parts
When you’re working with electricity, the quality of your materials is not the place to cut corners. Always choose good quality parts from trusted suppliers who follow safety rules, like NEMA standards. NEMA, the National Electrical Manufacturers Association, sets the standards for electrical equipment in North America, ensuring that plugs and outlets are safe and compatible. Look for a “UL Listed” mark on any replacement plugs or outlets you buy. This indicates that the product has been tested by Underwriters Laboratories and meets strict safety requirements. While it might be tempting to grab a cheap, unbranded part online, the potential risk isn’t worth the small savings. Professionals always use certified parts for everything from simple outlet replacements to complex residential standby generator installations.
Understanding Specialty Plugs (e.g., TT-30 for RVs)
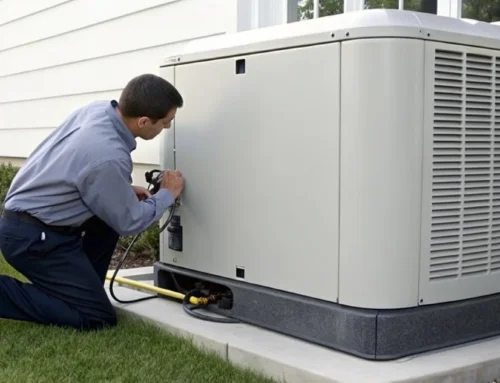
While the standard three-prong plug is the most common, you’ll find many different types of connectors made for specific uses. For example, TT-30 connectors are specifically designed for recreational vehicles (RVs) and are different from typical home outlets. They are built to handle the 30-amp service an RV requires. Similarly, Generac generators often use locking plugs, like the L14-30, which twist into place to create a secure connection that won’t accidentally get pulled out while powering your home during an outage. Each of these specialty plugs is designed for a specific voltage and amperage. Never try to force a plug into the wrong outlet or use an improper adapter, as this can damage your equipment and create a dangerous electrical situation.
Your Safety Equipment Checklist
This is the most important part of your prep work. Safety should always be your top priority with any electrical project. First and foremost, always turn off the power at the breaker panel for the circuit you are working on. Don’t just flip a switch; go to the source and shut it down completely. Use your voltage tester on the outlet or wires to be absolutely certain there is no current. When you’re making the connections, make sure the bare ground wire does not touch any of the hot (gold-colored) screws, as this will cause a short circuit. A good pair of safety glasses is also a smart idea to protect your eyes from any flying debris.
Using Tools with Insulated Handles
Even after you’ve shut off the power at the breaker, it’s smart to use tools with insulated handles. Think of them as an extra line of defense. These tools have non-conductive rubber or plastic coatings on the handles, which are designed to stop an electrical current from reaching your hand in case a wire is unexpectedly live. While this should never replace the crucial step of turning off the circuit and verifying with a voltage tester, it’s an essential precaution that adds another layer of safety to your project. Investing in a quality set of insulated screwdrivers and pliers is a wise move for any DIYer. If you’re ever unsure about a project’s safety, remember that our team is always ready to handle any electrician repairs for you.
How to Wire a 110-Volt Plug Step-by-Step
Ready to get hands-on? Wiring a 110-volt plug is a common and manageable DIY task if you follow the right steps. It’s all about being safe, understanding the components, and making secure connections. Let’s walk through the process together, from prepping your workspace to double-checking your work. Remember, while this is a great skill to learn, complex or recurring electrical issues are best left to the pros. If you ever feel unsure, our team is always ready to handle any electrician repairs you might need.
Safety First: What to Do Before You Start
Before you touch a single wire, your absolute first step is to turn off the power. Find your home’s breaker panel and flip the switch that controls the circuit you’ll be working on. If your breakers aren’t clearly labeled, you can use a circuit tester or simply turn off the main breaker to be extra cautious. This isn’t just a suggestion—it’s essential for preventing electric shock. Once the power is off, use a voltage tester at the outlet or on the wires to confirm there is no live current. Never assume the power is off; always test it yourself.
What Do the Different Wire Colors Mean?
When you look at your electrical cable, you’ll see three different colored wires inside. This color-coding system is universal and makes it easy to know what each wire does. You’ll find a green or bare copper wire, which is the ground wire. Its job is to provide a safe path for electricity to flow in case of a fault. Next, you’ll see a white wire, which is the neutral wire. It completes the electrical circuit. Finally, there’s a black or sometimes red wire. This is the hot (or live) wire, which carries the electrical current from the power source. Understanding these roles is key to a successful and safe wiring job.
Standard AC Wiring Colors
In the alternating current (AC) systems that power our homes, the color code is your roadmap to a safe connection. For standard 110-volt wiring, the black wire is always “hot,” meaning it carries the electrical current from the breaker panel. The white wire is “neutral,” and its job is to complete the circuit by carrying the current back to the panel. Finally, the green or bare copper wire is for grounding. This is a safety feature that provides a path for electricity to go in case of a short circuit, protecting you from shock. When you’re wiring a plug, you’ll connect the black wire to the brass or gold-colored screw, the white wire to the silver screw, and the ground wire to the green screw. Getting this right is fundamental to any residential electric project.
When a Red Wire is Also “Hot”
Just when you think you have the colors memorized, you might open an outlet box and find a red wire. Don’t panic—in AC wiring, red is also used as a “hot” wire. You’ll often see this in situations where two separate hot conductors are needed, such as wiring a ceiling fan that has both a fan and a light controlled by different switches. A red wire can also be used as the second hot wire in a 220-volt circuit. Just like the black wire, the red wire connects to a brass or gold-colored screw terminal on an outlet or switch. Think of it as a secondary live wire used for specific applications within your home’s electrical system.
Important Differences in AC vs. DC Wiring
It’s important to know that the wiring rules for your home’s outlets (AC) are different from those for many electronics and battery-powered systems (DC). While AC wiring uses “hot” and “neutral,” direct current (DC) circuits use “positive” and “negative” terminals. This is a critical distinction because the color conventions are swapped. In a DC circuit, the red wire is typically positive (+), and the black wire is negative (-). Confusing the two systems can damage electronics or prevent them from working at all. So, if you’re working on your car’s stereo or setting up some low-voltage landscape lighting, remember you’re in the world of DC, and the color rules have changed.
Common DC Wiring Colors and Polarity
To build on the previous point, let’s solidify the DC color code. In nearly all DC applications, from the battery in your car to a simple string of LED lights, red means positive (+) and black means negative (-). This concept is called polarity, and it’s essential for making sure electricity flows in the correct direction. Unlike AC power, which alternates direction, DC power flows in a single, direct path from positive to negative. Connecting a device with the polarity reversed can cause permanent damage. So, when you’re working with anything battery-operated or with a power adapter, always match red to positive and black to negative for a successful and safe connection.
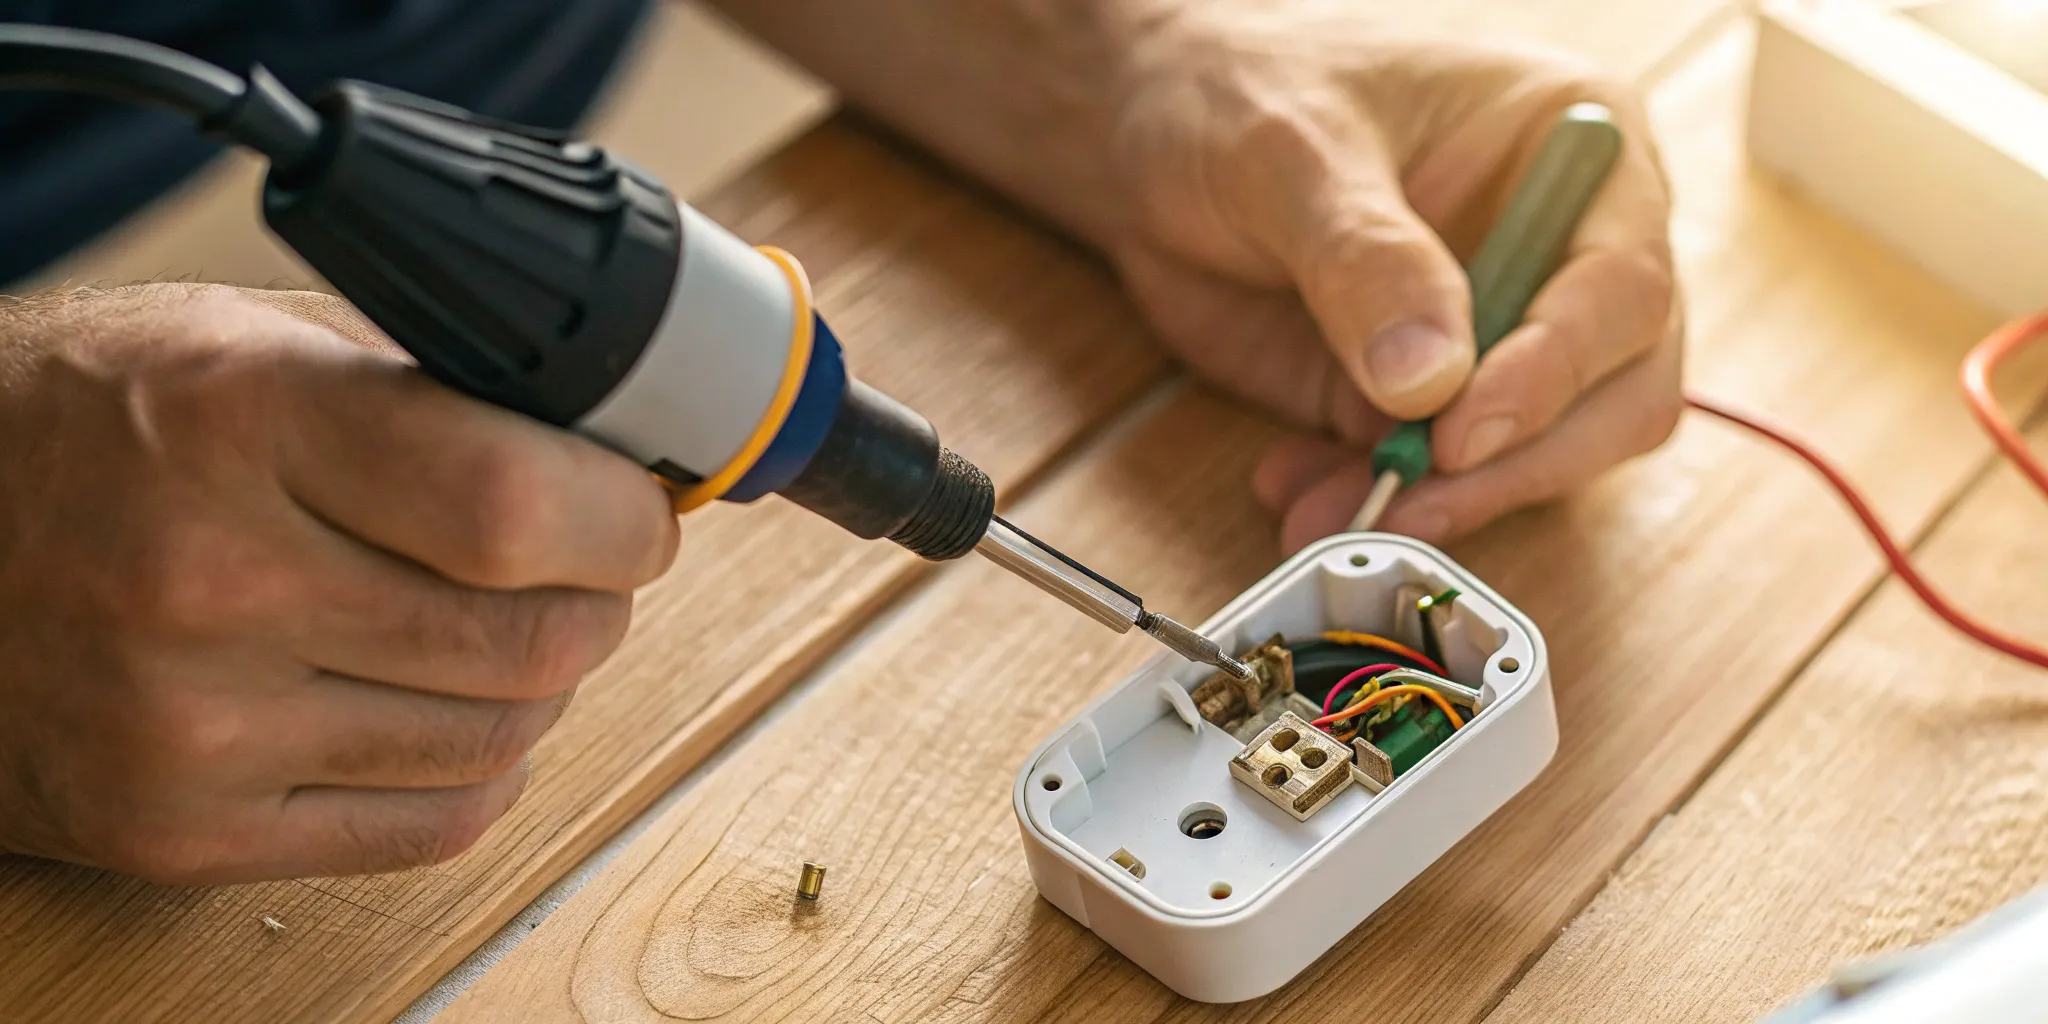
How to Connect Each Wire Correctly
Now for the main event: connecting the wires to the plug. Your new plug will have three corresponding screws, which are also color-coded. The rule is simple: match the wire to its correct screw. Start by attaching the green or bare copper ground wire to the green screw. Next, connect the white neutral wire to the silver-colored screw. Finally, attach the black (hot) wire to the gold-colored screw. This “black to gold, white to silver, green to green” mantra will help you remember the correct placement and ensure your appliance functions safely and correctly.
Tips for a Clean and Secure Connection
A secure connection is a safe connection. To make sure your wires stay put, it’s important to attach them properly. If you’re working with solid wire, use your pliers to bend a small hook or loop at the end. When you place this loop around the screw, make sure you wrap it clockwise—the same direction the screw tightens. This pulls the wire in tighter as you secure it. If you’re using stranded wire, it’s best to crimp spade connectors onto the bare ends first. This bundles the fine strands together, creating a solid point of contact and preventing stray wires from causing a short.
Common 110 Plug Wiring Mistakes to Avoid
Even a simple task has room for error, and a few common mistakes can cause big problems. The most critical error is connecting wires to the wrong terminals, like swapping the hot and neutral wires. This can disrupt the flow of electricity and potentially damage whatever you plug in. Another frequent mistake is looping the wire counter-clockwise around the screw terminal. When you tighten the screw, this can push the wire out instead of securing it, leading to a loose and unreliable connection. Taking a moment to double-check your work can save you from the headache of troubleshooting later or needing professional residential electric services.
How to Test and Troubleshoot Your New Outlet
You’ve wired the plug, and everything looks great. But the job isn’t finished until you’ve confirmed it works correctly and safely. Testing is a non-negotiable final step that protects you, your home, and your devices. It helps you catch common mistakes, like reversed wires or loose connections, before they can cause bigger problems. With a simple voltage tester or multimeter, you can get a clear picture of your work and have confidence that your new plug is ready for use. This process is straightforward and gives you the peace of mind that comes from knowing a job is done right.
How to Safely Test Your Connections
Before you plug anything in, it’s time to test your work. The safest way to do this is with a multimeter or a simple voltage tester. First, make sure no appliances are plugged into the outlet. Go back to your circuit breaker and turn the power back on for that specific circuit. Carefully insert the two probes of your tester into the outlet slots. For a standard outlet, one probe goes into the shorter (hot) slot and the other into the taller (neutral) slot. This simple check ensures the outlet is receiving power and is wired correctly before you ever connect a device.
What Your Voltage Tester Is Telling You
Your voltage tester gives you immediate feedback. When you insert the probes into the hot and neutral slots, you should get a reading of approximately 110 to 120 volts. This confirms that the outlet is live and has the correct voltage. If you get a reading of zero, it means there’s no power reaching the outlet. This could be due to a tripped breaker or a loose connection you need to re-check (after turning the power off again, of course). An inconsistent or incorrect voltage reading signals a more serious wiring issue that needs attention.
Fixing Common Wiring Problems
If your test reveals a problem, the cause is often a simple mistake. One of the most frequent errors is reversing the hot and neutral wires. This disrupts the flow of electricity and can damage appliances over time. Another common issue is a loose connection inside the plug—if the wires aren’t securely fastened under the terminal screws, the connection can fail. To fix these, turn the power off at the breaker, reopen the plug, and double-check that the black wire goes to the brass screw and the white wire goes to the silver screw. Ensure all connections are snug before reassembling. If you’re still having trouble, it may be time to look into professional electrician repairs.
Understanding GFCI and Specialty Outlets
It’s worth noting that not all outlets are the same. If you’re working on an outlet in a kitchen, bathroom, or outdoor area, you’re likely dealing with a Ground Fault Circuit Interrupter (GFCI) outlet. These are designed to protect you from electrical shock by instantly shutting off power if they detect a ground fault. GFCI outlets have “TEST” and “RESET” buttons on their face. After wiring one, you’ll need to press the “RESET” button to activate it. Testing it is as simple as pressing the “TEST” button to ensure it cuts the power as intended.
Staying Up to Code (And When to Call a Pro)
While replacing a 110-volt plug is a manageable task for many, it’s important to know your limits. Electrical work is governed by local codes to ensure safety, and mistakes can have serious consequences. If your breaker keeps tripping after you’ve checked your work, if you see sparks, or if you feel unsure at any point in the process, it’s time to call a professional. A licensed electrician can quickly diagnose the problem and ensure everything is safe and up to code. At M.T. Ruhl, our team is always ready to handle complex residential electrical work so you can have complete confidence in your home’s safety.
Related Articles
- Hiring an Electrical Repair Service? Read This First
- How Much to Replace an Electrical Panel in 2025?
- Price for Electrical Panel Upgrade: A 2025 Cost Guide
Frequently Asked Questions
Why are outlets called 110-volt, 115-volt, and 120-volt? Which one is correct? All of those terms refer to the same standard electrical system we use in North America. The voltage in a home can fluctuate slightly, so these numbers simply represent the nominal range. For any DIY project, you can consider them interchangeable. You don’t need to worry about finding a specific “120-volt” plug; a standard plug is what you need.
What happens if I accidentally switch the hot and neutral wires? This is one of the most important details to get right. If you reverse these wires, your device might still turn on, but the outlet will be unsafe. The appliance’s internal components will remain energized even when the switch is off, creating a serious shock hazard. Always remember the simple rule: black wire to the gold screw, and white wire to the silver screw.
My old outlet only has two slots. Can I just replace it with a modern three-prong outlet? You should not replace a two-prong outlet with a three-prong one unless you can confirm there is a ground wire present in the electrical box. Simply installing a new outlet without a proper ground connection gives a false sense of security. An ungrounded three-prong outlet won’t protect you or your electronics from a short circuit. If you have two-prong outlets, it’s best to have a professional electrician evaluate your wiring.
How do I know if an appliance needs a 110-volt or a 220-volt plug? The easiest way is to look at the plug itself. A 220-volt plug is larger and has a distinct prong configuration that won’t fit in a standard outlet. You can also check the appliance’s power label or manual. Generally, most of your everyday items use 110-volts, while large appliances that generate a lot of heat, like electric dryers, ovens, and some large air conditioners, require a 220-volt connection.
Is it really necessary to use a voltage tester if I already shut off the breaker? Yes, absolutely. This is the one step you should never skip. Breaker panels can be mislabeled, or there could be an issue with the wiring you’re unaware of. A voltage tester is your only way to be 100% certain that the circuit is dead before you touch any wires. It’s an inexpensive tool that provides the ultimate confirmation of a safe work environment.